When talking about secrets (passwords, tokens, etc.), it goes without saying that this kind of data must be protected. With Azure Key Vault you can rely on a managed service for securely managing keys, secrets and certificates for your applications.
Sometimes, especially when developing service-based applications, there could be the need for individual secret handling. In this article, I will show you why customized secret handling could be relevant to you and how to implement it for Azure Key Vault using ASP.NET.
Using Azure Key Vault in ASP.NET
Applications developed using ASP.NET typically use the embedded system for configuration by using one or more configuration providers. A provider reads key-value pairs from specific sources and makes the whole configuration available via a uniform interface.
The most common provider is the JSON configuration provider that is responsible for processing the appsettings.json files. Another important provider is the environment variables configuration provider. As the name suggests, this provider loads the settings from environment variables.
var builder = WebApplication.CreateBuilder(args);
var app = builder.Build();

app.MapGet("/", () => "Hello World!");

app.Run();
The above code snippet shows a minimal .NET API that registers various configuration providers by default. The properties mapped by the providers are prioritized according to the registration order. That means when multiple configuration providers contain the same property the value from the latest provider is used.
Call Stack:
WebApplication.CreateBuilder(...) -> new HostApplicationBuilder(...) -> HostingBuilderExtensions.ApplyDefaultAppConfiguration(...)Default configuration providers:
JSON, User Secrets, Environment Variables, Command Line
To add Azure Key Vault as a configuration provider we have to add the NuGet package first:
dotnet add package Azure.Extensions.AspNetCore.Configuration.Secrets
Now we can add Azure Key Vault as an additional configuration data source as shown in the next example:
using Azure.Identity;

var builder = WebApplication.CreateBuilder(args);

// Add Azure Key Vault as a configuration provider
// To benefit from authorization using DefaultAzureCredential,
// please install Microsoft.Identity.Web in addition.
builder.Configuration.AddAzureKeyVault(
  new Uri(builder.Configuration["KeyVaultUri"]),
  new DefaultAzureCredential());

var app = builder.Build();

app.MapGet("/", () => "Hello World!");

app.Run();
In this case we are using appsettings.json file like the one below:
{
  "Logging": {
    "LogLevel": {
      "Default": "Warning"
    }
  },
  "KeyVaultUri": "https://<<key-vault-name>>.vault.azure.net/",
  "SecretProperty": ""
}
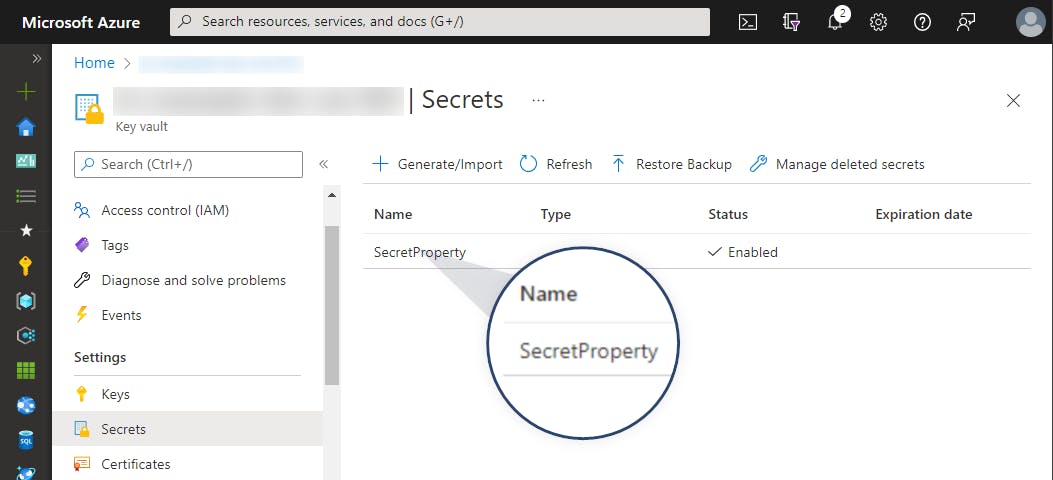
After adding a secret named SecretProperty to our Azure KeyVault the value defined via appsettings.json will be replaced with the one from our vault.

As you can see resilient and secure secret management within your applications can be very simple using Azure Key Vault. With these basics in mind, we can now start customizing the secret handling.
Why customize secret handling?
Think of a microservice-based application. Two services use a secret named with the same key but with service-specific values. When both services now use the same Azure Key Vault we have to consider the need for service-specific values for the same key.
To make it a more tangible, let's consider the following example:
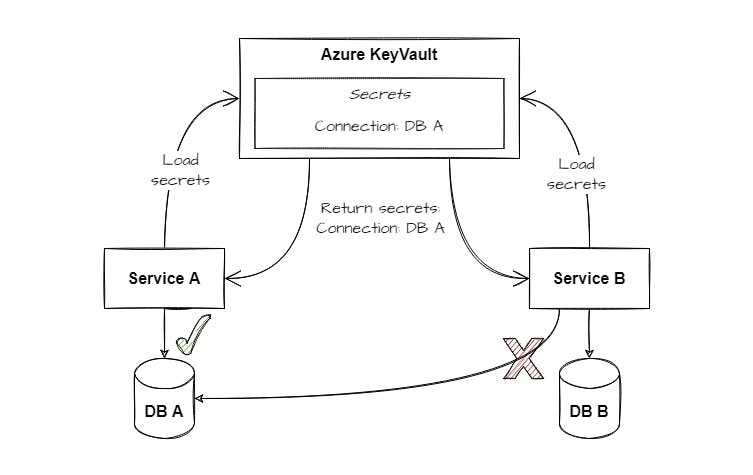
A property named Connection is available in both services but represents the connection to an individual database per service. So the value of the property must be individual for each service. Otherwise, it will result in a misconfiguration as shown in the following figure:

In the case above we cannot use a property named Connection within the KeyVault since we have to cover different values. Of course, we can use different secret key names to get around this behavior. But this is not a clean solution. Fortunately, there is the KeyVaultSecretManager class. It allows us to modify the behavior of how secrets are consumed and transferred to the application configuration. In the following section, we will have a look at a sample implementation using a prefix to differentiate the settings for the two services.
How to customize secret handling?
The Azure Key Vault SDK already has support to register a KeyVaultSecretManager that allows us to customize how secrets are processed. Therefore, a secret manager instance can be passed along with the Azure Key Vault registration. Within the next sample code, PrefixPreferredKeyVaultSecretManager is used as a custom secret manager implementation.
using Azure.Identity;

var builder = WebApplication.CreateBuilder(args);

// Add Azure Key Vault as a configuration provider
// To benefit from authorization using DefaultAzureCredential,
// please install Microsoft.Identity.Web in addition.
builder.Configuration.AddAzureKeyVault(
  new Uri(builder.Configuration["KeyVaultUri"]),
  new DefaultAzureCredential(),
  new PrefixPreferredKeyVaultSecretManager("ServiceA"));

var app = builder.Build();

app.MapGet("/", () => "Hello World!");

app.Run();
But what does the PrefixPreferredKeyVaultSecretManager actually do?
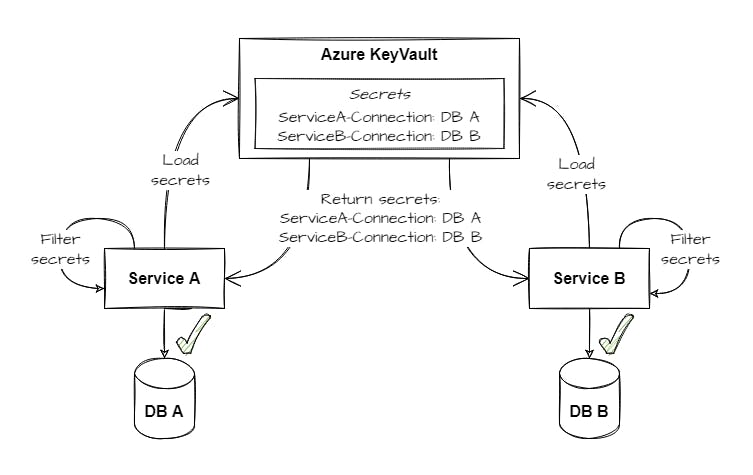
You will find the answer in the next figure:

The Azure Key Vault now contains two secrets, each representing the value required for the specific service. During the startup of the application, all secrets are loaded and subsequently filtered according to the defined rules. In our example, we are using a prefix-based approach. The secret ServiceA-Connection is applied to ServiceA and the secret ServiceB-Connection is used within ServiceB.
Now it is time to have a close look at the PrefixPreferredKeyVaultSecretManager implementation that is shown in the following code block:
internal sealed class PrefixPreferredKeyVaultSecretManager : KeyVaultSecretManager
{
    private readonly string _prefix;

    public PrefixPreferredKeyVaultSecretManager(string prefix) => _prefix = $"{prefix}-";

    public override Dictionary<string, string> GetData(IEnumerable<KeyVaultSecret> secrets)
    {
        return base.GetData(secrets)
            .GroupBy(x => x.Key.Replace(_prefix, string.Empty))
            .Select(x => new { x.Key, Value = x.OrderByDescending(y => y.Key).First() })
            .ToDictionary(x => x.Key, x => x.Value.Value);
    }
}
The PrefixPreferredKeyVaultSecretManager inherits from KeyVaultSecretManager. So we can integrate into the secret loading mechanism via the override of the method GetData(IEnumerable<KeyVaultSecret> secrets). First of all, we are calling the base method to retrieve all available secrets. Let's assume that we have the following secrets stored within the Azure Key Vault instance:
- Connection:Fallback
- ServiceA-Connection:ValueA
- ServiceB-Connection:ValueB
In a second step, the prefix-based filter logic is applied according to the following schema:
- Group by the secret key
- Connection - Connection:Fallback - ServiceA-Connection:ValueA - ServiceB-Connection - ServiceB-Connection:ValueB - Sort per group to find the correct value for our prefix
- Connection - ServiceA-Connection:ValueA - Connection:Fallback - ServiceB-Connection - ServiceB-Connection:ValueB - Use the first entry per group as the final configuration value
- Connection -> ValueA
- ServiceB-Connection -> ValueB
The approach above allows us to specify service-specific secrets as well as a kind of 'fallback' secret that is used when no service-specific secret is available. The approach represents just one possible way and of course, it can be further improved, e.g. by removing values from other services. But basically, that is all you have to do to implement individual secret handling with Azure Key Vault in ASP.NET.
Wrapping up
In this article, I explained why a customized secret management can be useful and how to use it along with Azure Key Vault in ASP.NET projects. A sample implementation for KeyVaultSecretManager shows how a prefix-preferred approach can be integrated as one possible solution. Of course, there are many other options. So you can find the right way according to your requirements.
Thank you for taking the time to read my article. 😄
If you enjoyed it and want to see more coding-related content then follow me on my social profiles. Don't hesitate to like, comment or share this post. I appreciate any kind of feedback on this article.

