

Using WSL 2 in Enterprises
Install, configure and distribute WSL 2 inside corporate environments


The Windows Subsystem for Linux (WSL) enables the execution of a Linux environment directly on Windows without the need for virtual machines or any other similar setup. Using WSL 2 a lot of things become easier and faster in comparison with the first version. But when running on a system located within a corporate environment there are often some restrictions like corporate proxies, custom nameservers or SSL inspection. So before you can access the internet, install additional packages or use the Visual Studio Debugger for WSL 2, among others, some challenges have to be accomplished first. This article summarises some common steps to get started with WSL 2 within corporate environments.
Install WSL 2 distro
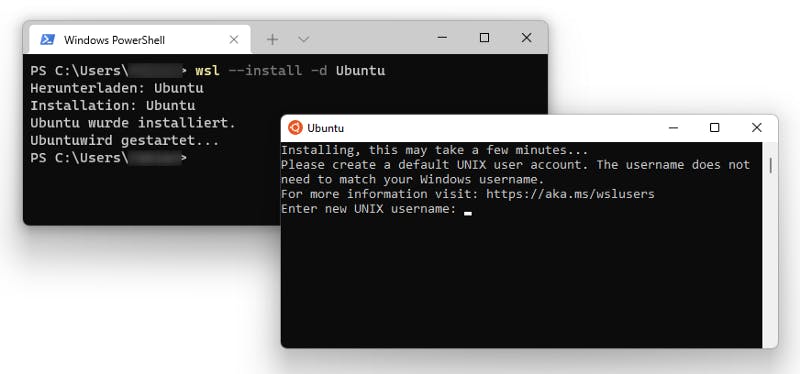
Before diving into a specific configuration WSL 2 must be installed on the system. The installation of WSL 2 is covered by great documentation provided by Microsoft. On new Windows systems (Windows 10 Build 19041 and higher or Windows 11) it is fairly easy.
# Schema
wsl --install -d <<distro>>

# Install Ubuntu
wsl --install -d Ubuntu
The only thing you have to do is to execute the above command within a PowerShell prompt.
On older systems, there are some more steps to perform. They are described within separate documentation. The default distribution used by WSL is Ubuntu that we also use inside this article.
By default, the distribution will be installed via Microsoft Store. But inside corporate environments, there could be limitations when you try to access the store, e.g. by app or firewall restrictions. For this scenario, the distributions can be installed using a manual process using the respective *.appx files. To find the download link for the distribution of your choice just a look at the link collection within Microsoft Docs. Ubuntu 20.04 can be downloaded via https://aka.ms/wslubuntu2004 After downloading install the appx-package by executing it from the windows host.
At this point you should be able to access the WSL 2 system via command line, e.g. by displaying a list of all installed distributions:
wsl --list
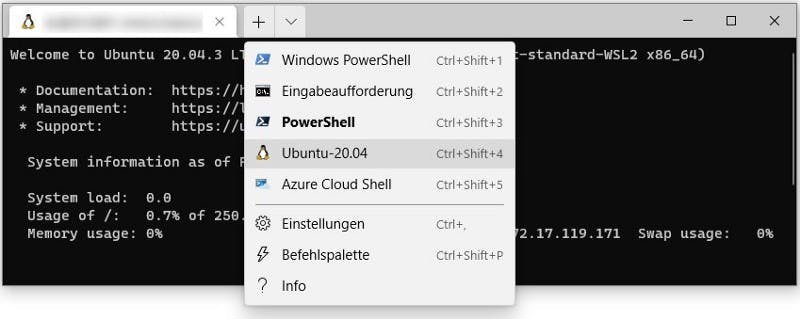
Windows Terminal has a nice WSL 2 integration whereby you can start an instance directly.
Configure the WSL 2 distro
Internet access within corporate environments is often managed and limited by proxy servers and custom nameservers. To allow the WSL 2 instance to access the internet some special setup is needed. The next sections cover these steps.
Handle corporate proxy servers
The most common setup for proxy servers is controlled by the environment variables http_proxy and https_proxy. Due to some tools using case-sensitive access we have to create variables using the lower as well as upper case.
In the following examples, we use [http://server.domain:8080](http://server.domain:8080) as our proxy server.
# Create or edit the global available environment variables
sudo nano /etc/environment

# Append the following lines and save/exit the file
http_proxy="http://server.domain:8080"
HTTP_PROXY="http://server.domain:8080"

https_proxy="http://server.domain:8080"
HTTPS_PROXY="http://server.domain:8080"
The above configuration does fit many cases. But there are some tools and scenarios in which a separate setup is required. For example, if you would like to debug .NET apps in WSL 2 with Visual Studio. The extension checks and installs missing dependencies automatically. Without the additional setup for wget, as stated below, the installation will fail when using corporate proxies.
curl
Curl is a command-line tool for transferring data specified with URL syntax. (curl/curl)
# Edit curl configuration
sudo nano ~/.curlrc

# Add/append the following line and save/exit the file
proxy = http://server.domain:8080
wget
wget is a free software package for retrieving files using HTTP, HTTPS, FTP and FTPS, the most widely used Internet protocols. (Wget — GNU Project)
# Edit wget configuration
sudo nano /etc/wgetrc

# Add/append the following line and save/exit the file
https_proxy = http://server.domain:8080
http_proxy = http://server.domain:8080

use_proxy = on
apt
The apt command is a command-line tool, which works with Ubuntu’s Advanced Packaging Tool (APT) performing such functions as installation of new software packages, upgrade of existing software packages, updating of the package list index, and even upgrading the entire Ubuntu system. (Package Management | Ubuntu)
# Create apt configuration
cd /etc/apt/apt.conf.d

sudo touch proxy.conf
sudo nano proxy.conf

# Add the following line and save/exit the file
Acquire::http::Proxy "http://server.domain:8080";
Acquire::https::Proxy "http://server.domain:8080";
Consider custom nameservers
Another common setup within a corporate environment is custom nameservers. They are used instead of the public available ones, like 8.8.8.8 which represents a nameserver provided by Google.
In some cases, WSL 2 is not able to resolve the matching configuration by default. In such situations, we have to modify /etc/wsl.conf and add the custom server manually. To do so just follow the next steps:
- Disable automatic generation of resolv.conf
# Edit the default WSL configuration
sudo nano /etc/wsl.conf

# Add the following lines and save/exit the file
[network]
generateResolvConf = false
2. Shutdown and restart the WSL 2 instance
# Shutdown running instance
wsl --shutdown

# Restart and enter a new instance
wsl
3. Adding specific DNS nameservers using /etc/resolv.conf
# Create/Edit the configuration
sudo nano /etc/resolv.conf

# Append the setup using the custom nameservers and save/exit the file
nameserver <<ip-address>>
nameserver <<ip-address>>
In some cases, an error may occur during editing. You can work around this issue by deleting the file using sudo rm /etc/resolv.conf
Deal with SSL inspection
After completing proxy and nameserver configuration, there could be another step that focuses on the setup that is required to deal with SSL inspection.
SSL inspection creates a dedicated SSL tunnel with the server and the user’s browser which allows to decrypt and inspect the incoming and outgoing HTTPS traffic.
In that case, we have to add the respective certificate to the WSL 2 specific certificate store. Otherwise, connections over HTTPS are blocked due to an SSL error.
# Create a directory for custom root certificates
sudo mkdir /usr/local/share/ca-certificates/extra

# Copy the the certificate from local system to WSL2 file system
sudo cp custom.crt /usr/local/share/ca-certificates/extra/custom.crt

# Import the custom *.crt file
sudo dpkg-reconfigure ca-certificates
sudo update-ca-certificates
From this point on, all required settings to use WSL 2 within corporate environments are set. But there is still a downside. The whole setup is valid for the local WSL 2 instance only. But what if the settings should be shared between colleagues? To learn about it just read the next section.
Build an own WSL 2 package
Within an enterprise environment it is best practice to manage and share settings and tools globally. For WSL 2 there are two options available at the moment.
- Sharing an image internally using WSL 2 commands
- Creating an enterprise-specific distro using WSL Distro Launcher
Other security and control-related options are still under development. But let’s cover the available possibilities we have at the moment starting with the simpler option to share a customized WSL 2 image.
Sharing a WSL 2 image using file shares
wsl --export Ubuntu CustomizedUbuntu.tar.gz
Afterwards, the exported image can be easily imported on further systems running WSL2 within the same environment.
wsl --import Ubuntu <<path-to-image>>\\CustomizedUbuntu.tar.gz
That’s all you have to do to share a pre-configured WSL 2 instance across different systems.
Creating an enterprise-specific launcher application
The second option that focuses on creating a custom launcher package is not so easy as the first one mentioned above. It is based on a project template available on GitHub. The next steps cover the minimal setup.
Clone the repository
First, you have to clone the repository. The repository contains the C++ reference implementation for a Windows Subsystem for Linux (WSL) distribution installer/launcher application. So in addition you have to ensure that the C++ workloads for Visual Studio are installed on your system.
Include the exported distro
Copy the previously exported WSL 2 image as install.tar.gz into the DistroLauncher-Appx directory.
Retarget projects
Depending upon your specific system setup (Visual Studio and Windows SDK version) you have to retarget both projects before continuing building the package.

Ensure this step is executed for each project within the solution.
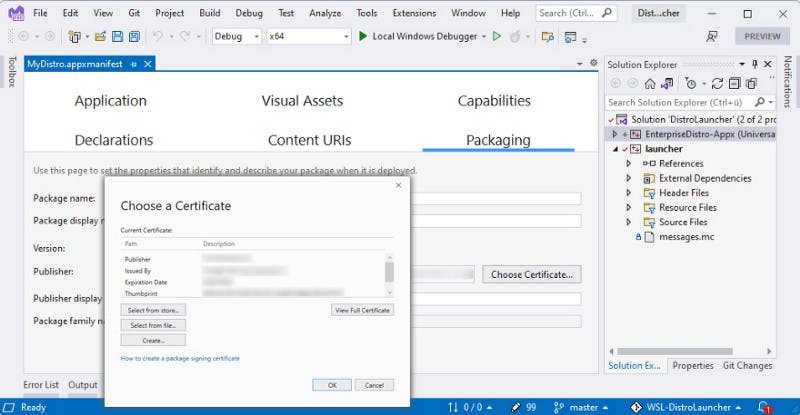
Add a certificate to sign the package
Windows requires that the resulting package is signed. Therefore, a CA trusted certificate must be applied to the appx-project. Therefore, you have to open the *.appx.manifest file and navigate to the tab name Packaging. Via Choose Certificate the custom certificate can be applied like shown in the following figure.
Considering all required steps are completed now, we can execute an initial build. We can use this build to check if all settings are correct before continuing further customization.
Build the package
To simplify the build process, the creators have placed a file named build.bat in the repository root. Before executing the batch file, check if one of the paths to MSBuild inside build.bat is valid. Depending upon your system setup you have to extend this list of paths. Now execute the batch and wait for the first bundle.

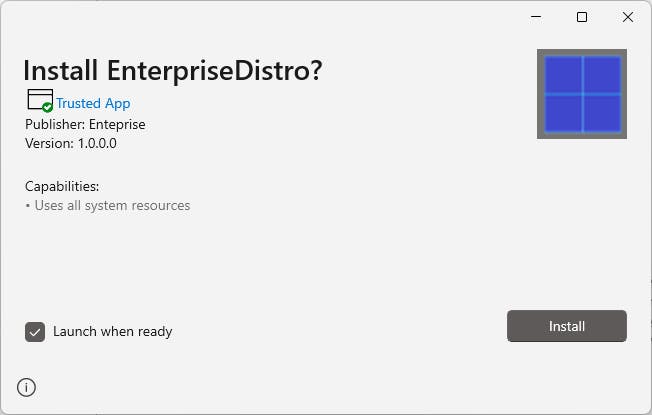
As a final result, a custom package is now available that can be distributed within your environment.
Wrapping up
In this article, I walked you through the specific settings of a WSL 2 setup concerning common enterprise environment challenges and how the setup can be distributed across different systems. Based on that, you are now able to build your own WSL 2 package covering your specific requirements and distribute it to different systems within the enterprise.
Thank you for taking the time to read my article. 😄
If you enjoyed it and want to see more coding-related content then follow me on my social profiles. Don't hesitate to like, comment or share this post. I appreciate any kind of feedback on this article.